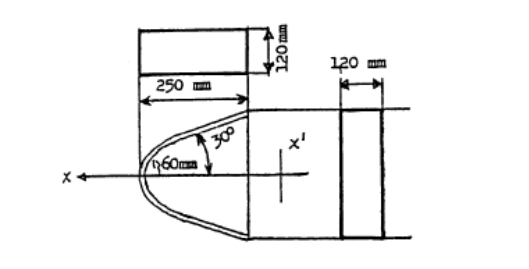
Vehicle Standard (Australian Design Rule 21/0021/00 – Instrument PanelInstrument Panel) 20062006 Amendment 11
I, ANTHONY NORMAN ALBANESE, Minister for Infrastructure, Transport, Regional Development and Local Government, determine this vehicle standard under subsection 7 (1) of the Motor Vehicle Standards Act 1989.
Dated 3 April 2008
[Signed]
Anthony Norman Albanese
Minister for Infrastructure, Transport, Regional Development and Local Government
CONTENTS
1. legislative provisions..............................................
2. amendment of vehicle standard......................................
Schedule 1.............................................................
- legislative provisions
- Name of Legislative Instrument
- This instrument is the Vehicle Standard (Australian Design Rule 21/00 – Instrument Panel) 2006 Amendment 1.
- Commencement
- This instrument commences on the day after it is registered.
- amendment of vehicle standard
- The changes specified in Schedule 1 amend Vehicle Standard (Australian Design Rule 21/00 – Instrument Panel) 2006.
Schedule 1
[1] Clause 21.0 renumber as 1.
[2] Clause 21.0.1 renumber as 1.1.
[3] Clause 21.0.1.1 renumber as 1.1.1.
[4] Clause 21.0.1.2 renumber as 1.1.2.
[5] Clause 21.0.2 renumber as 1.2.
[6] Clause 21.0.2.1 renumber as 1.2.1.
[7] Clause 21.0.3 renumber as 1.3.
[8] Clause 21.0.3.1 renumber as 1.3.1.
[9] Clause 21.0.3.2 renumber as 1.3.2.
[10] Clause A. renumber as 2. and replace “Function” with “Function and Scope”.
[11] Remove clause A.1 and text.
[12] Clause A.2 renumber as 2.1.
[13] Clause B. renumber as 3.
[14] Remove clause B. text and replace with following:
“3.1 This vehicle standard applies to the design and construction of vehicles as set out in clause 3.2”.
[15] Table C. renumbered as 3.2
[16] Clause 21.1 renumber as 4.
[17] Insert new clause
“4.1 For vehicle categories, definitions and meanings used in this standard, refer to:”
[18] Insert new clause “4.1.1 Vehicle Standard (Australian Design Rule Definitions and Vehicle Categories) 2005; and”
[19] Insert new clause
“4.1.2 Section 2 of Appendix A”
[20] Insert new clause
“5. REQUIREMENTS”
[21] Insert new clause
“5.1 Vehicles of applicable categories listed in clause 3.2 must comply with this standard by meeting the requirements of either Appendix A as varied by Section 6 – Exemptions and Alternative Procedures, or Appendix B.”
[22] Insert new clause
“5.2 Where ‘Technical Services’ is noted in Appendix A read ‘Technical Services’, ‘Test Facility’ or the ‘Administrator’.”
[23] Insert new clause
“5.3 Where ‘competent authority’ is noted in Appendix A read ‘competent authority’ or the ‘Administrator’.”
[24] Insert new clause
“5.4 Where reference is made to Regulation No. 17 in Appendix A, read ADR 3/… Appendix A.”
[25] Insert new clause
“5.5 Where reference is made to Regulation No. 16 in Appendix A, read ADR 4/… Appendix A.”
[26] Insert new clause
“6. Exemptions and Alternative Procedures
[27] Insert new clause
“ 6.1 Compliance with the following parts, sections and annexes of Appendix A is not required for the purposes of this standard.
Section 3 Application for approval
Section 4 Approval
Section 6 Modifications and extension of approval of the vehicle type
Section 7 Conformity of Production
Section 8 Penalties for non-conformity of production
Section 9 Production definitely discontinued
Section 10 Names and addresses of technical services responsible for conducting approval tests, and of administrative departments
Annex 2 Communication concerning the approval or extension or refusal or withdrawal of approval or production definitely discontinued of a vehicle type with regard to its interior fittings, pursuant to Regulation No. 21
Annex 3 Arrangements of the approval marks ”
[28] Insert new clause
“7. ALTERNATIVE STANDARDS”
[29] Insert new clause
“7.1 The technical requirements adopted by the United Nations – Economic Commission for Europe Regulation No. 21 “Uniform Provisions Concerning the Approval of Vehicles with Regard to Their Interior FITTINGS” incorporating the 01 series of amendments, shall be deemed to be equivalent to the technical requirements of this standard.”
[30] Insert following
“Appendix A
Uniform provisions concerning the approval of VEHICLES WITH REGARD TO THEIR INTERIOR FITTINGS
AGREEMENT
CONCERNING THE ADOPTION OF UNIFORM TECHNICAL PRESCRIPTIONS FOR WHEELED VEHICLES, EQUIPMENT AND PARTS WHICH CAN BE FITTED AND/OR BE USED ON WHEELED VEHICLES AND THE CONDITIONS FOR RECIPROCAL RECOGNITION OF APPROVALS GRANTED ON THE BASIS OF THESE PRESCRIPTIONS
(Revision 2, including the amendments entered into force on 16 October 1995)

Addendum 20: Regulation No 21
Revision 2
Incorporating:
01 series of amendments which entered into force on 08 October 1980
Supplement 1 to the 01 series of amendments which entered into force on 26 April 1986
Corrigendum 1 to Revision 1 referred in the depository notification
C.N 142.1986.Treaties-27 of 2 September 1986
the following amendments included by DITRDLG -VSS;
Supplement 2 to the 01 series of amendments - Date of entry into force: 18 January 1998
Corrigendum 1 the 01 series of amendments subject of Depositary Notification C.N.423.2000.TREATIES-1 dated 27 June 2000
Supplement 3 to 01 series of amendments – Date of entry into force: 31 January 2003
Uniform provisions concerning the approval of VEHICLES WITH REGARD TO THEIR INTERIOR FITTINGS


 Contents
REGULATION
- Scope
- Definitions
- Application for approval
- Approval
- Requirements
- Modifications and extension of approval of the vehicle type
- Conformity of production
- Penalties for non-conformity of production
- Production definitely discontinued
- Names and addresses of technical services responsible for conducting approval tests, and of administrative departments
ANNEXES
Annex 1 Determination of the head-impact zone
Annex 2 Communication concerning the approval or extension or refusal or withdrawal of approval or production definitely discontinued of a vehicle type with regard to its interior fittings, pursuant to Regulation No. 21
Annex 3 Arrangements of the approval marks
Annex 4 Procedure for testing energy-dissipating materials
Annex 5 Procedure for determining the "H" point and the actual torso angle for seating positions in motor vehicles
Appendix 1 - Description of the three-dimensional "H" point machine
Appendix 2 - Three-dimensional reference system
Appendix 3 - Reference data concerning seating positions
Annex 6 Method of measuring projections
Appendix
Annex 7 Apparatus and procedure for application of paragraph 5.2.1.of this Regulation
Annex 8 Determination of a dynamically determined head impact zone
Annex 9 Typical position of cylindrical test rod in the opening roof and window openings
Annex 10 Explanatory notes
- SCOPE
This Regulation applies to the interior fittings of vehicles of category M1 with regard to:
1.1 the interior parts of the passenger compartment other than the rear-view mirror or mirrors;
1.2 the arrangement of the controls;
1.3 the roof or opening roof, and
1.4 the seat-back and the rear parts of seats.
1.5 power-operation of windows, roof panels and partition systems.
2. DEFINITIONS
For the purposes of this Regulation,
2.1 "approval of a vehicle" means the approval of a vehicle type with regard to its interior fittings;
2.2 "vehicle type" with regard to the interior fittings of the passenger compartment means vehicles of category M1 which do not differ in such essential respects as:
2.2.1 the lines and constituent materials of the bodywork of the passenger compartment;
2.2.2 the arrangement of the controls;
2.2.3 the performance of the protective system, if the reference zone within the head impact zone determined according to annex 8 (dynamic evaluation) is chosen by the applicant.
2.2.3.1 Vehicles that differ only in the performance of the protective system(s) belong to the same vehicle type if they offer an equal or better protection for the occupants compared with the system or vehicle submitted to the technical service responsible for conducting the approval tests.
2.3 "reference zone" is the head impact zone as defined in annex 1 to this Regulation, or at the choice of the manufacturer, according to annex 8, excluding the following areas: (see annex 10, explanatory notes, paragraphs 2.3. and 2.3.1.)
2.3.1 the area bounded by the forward horizontal projection of a circle circumscribing the outer limits of the steering control, increased by a peripheral band 127 mm in width; this area is bounded below by the horizontal plane tangential to the lower edge of the steering control when the latter is in the position for driving straight ahead. (see annex 10, explanatory notes, paragraphs 2.3. and 2.3.1.)
2.3.2 the part of the surface of the instrument panel comprised between the edge of the area specified in paragraph 2.3.1. above and the nearest inner side-wall of the vehicle; this part of the surface is bounded below by the horizontal plane tangential to the lower edge of the steering control and; (see annex 10, explanatory notes, paragraphs 2.3. and 2.3.1.)
2.3.3 the windscreen side pillars; (see annex 10, explanatory notes, paragraphs 2.3. and 2.3.1.)
2.4 "level of the instrument panel" means the line defined by the points of contact of vertical tangents to the instrument panel; (see annex 10, explanatory notes, paragraph 2.4.)
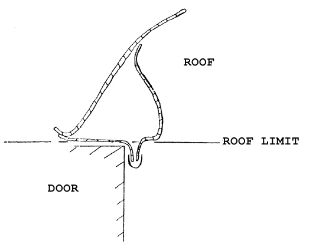
2.5 "roof" means the upper part of the vehicle extending from the upper edge of the windscreen to the upper edge of the rear window and bounded at the sides by the upper framework of the side-walls; (see annex 10, explanatory notes, paragraph 2.5.)
2.6 "belt line" means the line constituted by the transparent lower contour of the side windows of the vehicle;
2.7 "convertible car" means a vehicle where, in certain configurations, there is no rigid part of the vehicle body above the belt line with the exception of the front roof supports and/ or the roll-over bars and/or the seat-belt anchorages points; (see annex 10, explanatory notes, paragraphs 2.5. and 2.7.)
2.8 "vehicle with opening roof" means a vehicle of which only the roof or part of it can be folded back or be opened, or may slide, leaving the existing structural elements of the vehicle above the belt line (see annex 10, explanatory notes, paragraph 2.5.)
2.9 "folding (tip-up) seat" means an auxiliary seat intended for occasional use and which is normally folded out of the way.
2.10 "Protective system" means interior fittings and devices intended to restrain the occupants.
2.11 "Type of a protective system", means a category of protective devices which do not differ in such essential respects as:
2.11.1 their technology;
2.11.2 their geometry;
2.11.3 their constituent materials.
2.12 "Power-operated windows" means windows which are closed by power supply of the vehicle.
2.13 "Power-operated roof-panel systems" means movable panels in the vehicle roof which are closed by power supply of the vehicle by either a sliding and/or tilting motion, and which do not include convertible top systems.
2.14 "Power-operated partition systems" means systems which divide a passenger car compartment into at least two sections and which are closed using the power supply of the vehicle.
2.15 "Opening" is the maximum unobstructed aperture between the upper edge or leading edge, depending on the closing direction, of a power-operated window or partition or roof panel and the vehicle structure which forms the boundary of the window, partition or roof panel, when viewed from the interior of the vehicle or, in the case of partition system, from the rear part of the passenger compartment.
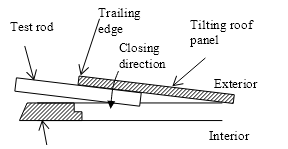
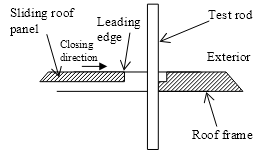
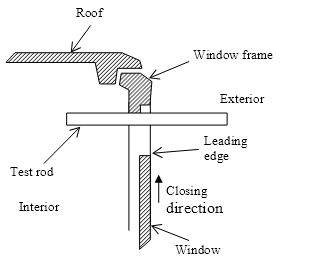
To measure an opening, a cylindrical test rod shall (without exerting force) be placed through it normally perpendicular to the edge of the window, roof panel or partition and perpendicular to the closing direction as shown in Figure 1 of annex 9, from the interior through to the exterior of the vehicle or, as applicable, from the rear part of the passenger compartment.
2.16 "Key"
2.16.1 "Ignition key" means the device that operates the electric power supply necessary to operate the engine or motor of the vehicle. This definition does not preclude a non mechanical device.
2.16.2 "Power key" means the device which allows power to be supplied to the power systems of the vehicle. This key may also be the ignition key. This definition does not preclude a non mechanical device.
2.17 "Airbag" means a device installed to supplement safety belts and restraint systems in power driven vehicles, i.e. systems which in the event of a severe impact affecting the vehicle automatically deploy a flexible structure intended to limit, by compression of the gas contained within it, the severity of the contacts of one or more parts of an occupant of the vehicle with the interior of the passenger compartment.
2.18 A "sharp edge" is an edge of a rigid material having a radius of curvature of less than 2.5 mm except in the case of projections of less than 3.2 mm, measured from the panel according to the procedure described in paragraph 1 of annex 6. In this case, the minimum radius of curvature shall not apply provided the height of the projection is not more than half its width and its edges are blunted (see annex 10, explanatory notes, paragraph 2.18.)
3. APPLICATION FOR APPROVAL
3.1 The application for approval of a vehicle type with regard to its interior fittings shall be submitted by the vehicle manufacturer or by his duly accredited representative.
3.2 It shall be accompanied by the undermentioned documents in triplicate and the following particulars:
a detailed description of the vehicle type with regard to the items mentioned in paragraph 2.2. above, accompanied by a photograph or an exploded view of the passenger compartment. The numbers and/or symbols identifying the vehicle type shall be specified.
3.3 The following shall be submitted to the technical service responsible for conducting the approval tests:
3.3.1 at the manufacturer's discretion, either a vehicle representative of the vehicle type to be approved or the part or parts of the vehicle regarded as essential for the checks and tests prescribed by this Regulation;
3.3.2 at the request of the aforesaid technical service, certain components and certain samples of the materials used.
4. APPROVAL
4.1 If the vehicle type submitted for approval pursuant to this Regulation meets the requirements of paragraph 5. below, approval of that vehicle type shall be granted.
4.2 An approval number shall be assigned to each type approved. Its first two digits (at present 01 corresponding to the 01 series of amendments which entered into force on 26 April 1986) shall indicate the series of amendment incorporating the most recent major technical amendments made to the Regulation at the time of issue of the approval. The same Contracting Party may not assign the same number to another vehicle type.
4.3 Notice of approval or of extension or refusal or of withdrawal of approval or production definitely discontinued of a vehicle type pursuant to this Regulation shall be communicated to the Parties to the Agreement which apply this Regulation by means of a form conforming to the model in annex 2 to this Regulation.
4.4 There shall be affixed, conspicuously and in a readily accessible place specified on the approval form, to every vehicle conforming to a vehicle type approved under this Regulation, an international approval mark consisting of:
4.4.1 a circle surrounding the letter "E" followed by the distinguishing number of the country which has granted approval;
4.4.2 the number of this Regulation, followed by the letter "R", a dash and the approval number to the right of the circle prescribed in paragraph 4.4.1. above.
4.5 If the vehicle conforms to a vehicle type approved, under one or more other Regulations Annexed to the Agreement, in the country which has granted approval under this Regulation, the symbol prescribed in paragraph 4.4.1. need not be repeated; in such a case, the regulation and approval numbers and the additional symbols of all the Regulations under which approval has been granted in the country which has granted approval under this Regulation shall be placed in vertical columns to the right of the symbol prescribed in paragraph 4.4.1. above.
4.6 The approval mark shall be clearly legible and be indelible.
4.7 The approval mark shall be placed close to or on the vehicle data plate affixed by the manufacturer.
4.8 Annex 3 to this Regulation gives examples of arrangement of the approval marks.
5. REQUIREMENTS
5.1 Forward interior parts of the passenger compartment above the level of the instrument panel in front of the front seat "H" points, excluding the side doors
5.1.1 The reference zone defined in paragraph 2.3. above shall not contain any dangerous roughness or sharp edges likely to increase the risk of serious injury to the occupants. If the head impact area is determined according to annex 1, the parts referred to in paragraphs 5.1.2. to 5.1.6. below shall be deemed satisfactory if they comply with the requirements of those paragraphs. If the head impact area is determined according to annex 8, the requirements of paragraph 5.1.7. shall apply (see annex 10, explanatory notes, paragraph 5.1.1.).
5.1.2 Vehicle parts within the reference zone with the exception of those which are not part of the instrument panel and which are placed at less than 10 cm from glazed surfaces shall be energy-dissipating, as prescribed in annex 4 to this Regulation. Those parts within the reference zone which satisfy both of the following conditions shall also be excluded from consideration if: (see annex 10, explanatory notes, paragraph 5.1.2.)
5.1.2.1 during a test in accordance with the requirements of annex 4 of this Regulation, the pendulum makes contact with parts outside the reference zone; and
5.1.2.2 parts to be tested are placed less than 10 cm away from the parts contacted outside the reference zone, this distance being measured on the surface of the reference zone;
any metal support fittings shall have no protruding edges.
5.1.3 The lower edge of the instrument panel shall, unless it meets the requirements of paragraph 5.1.2. above, be rounded to a radius of curvature of not less than 19 mm. (see annex 10, explanatory notes, paragraph 5.1.3.)
5.1.4 Switches, pull-knobs and the like, made of rigid material which, measured in accordance with the method prescribed in annex 6, project from 3.2 mm to 9.5 mm from the panel shall have a cross sectional area of not less than 2 cm2, measured 2.5 mm from the point projecting furthest and shall have rounded edges with a radius of curvature of not less than 2.5 mm.: (see annex 10, explanatory notes, paragraph 5.1.4.)
5.1.5 If these components project more than 9.5 mm from the surface of the instrument panel, they shall be so designed and constructed as to be able, under the effect of a longitudinal horizontal force of 37.8 daN delivered by a flat-ended ram of not more than 50 mm diameter, either to retract into the surface of the panel until they do not project by more than 9.5 mm or to become detached; in the latter case, no dangerous projections of more than 9.5 mm shall remain; a cross-section of not more than 6.5 mm from the point of maximum projection shall be not less than 6.5 cm2 in area. (see annex 10, explanatory notes, paragraph 5.1.5.)
5.1.6 In the case of a projection comprising a component made of non-rigid material of less than 50 shore A hardness mounted on a rigid support, the requirements of paragraphs 5.1.4. and 5.1.5. shall apply only to the rigid support or it shall be demonstrated by sufficient tests according to the procedure described in annex 4 that the soft material of less than 50 shore A hardness will not be cut so as to contact the support during the specified impact test. In that case the radius requirements shall not apply (see annex 10, explanatory notes, paragraph 5.1.6.)
5.1.7 The following paragraphs shall apply:
5.1.7.1 If the protective system of the vehicle type cannot prevent head contacts of the occupants defined in paragraph 1.2.1. of annex 8 with the instrument panel, and a dynamic reference zone according to annex 8 is determined, the requirements of paragraphs 5.1.2. to 5.1.6. are applicable only to the parts located in that zone.
Parts in other areas of the dashboard above the level of the instrument panel, if contractable by a 165 mm diameter sphere, shall be at least blunted.
5.1.7.2 If the protective system of the vehicle type is able to prevent head contacts of the occupants defined in paragraph 1.2.1. of annex 8 with the instrument panel and therefore no reference zone can be determined, the requirements of paragraphs 5.1.2. to 5.1.6. are not applicable to this vehicle type.
Parts of the dashboard above the level of the instrument panel, if contractable by a 165 mm diameter sphere, shall be at least blunted.
5.2 Forward interior parts of the passenger compartment below the level of the instrument panel and in front of the front seat "H" points, excluding the side doors and the pedals
5.2.1 Except for the pedals and their fixtures and those components that cannot be contacted by the device described in annex 7 to this Regulation and used in accordance with the procedure described therein, components covered by paragraph 5.2., such as switches, the ignition key, etc. shall comply with the requirements of paragraphs 5.1.4. to 5.1.6.
5.2.2 The handbrake control, if mounted on or under the instrument panel, shall be so placed that when it is in the position of rest there is no possibility of the occupants of the vehicle striking against it in the event of a frontal impact. If this condition is not met, the surface of the control shall satisfy the requirements of paragraph 5.3.2.3. below (see annex 10, explanatory notes, paragraph 5.2.2.).
5.2.3 Shelves and other similar items shall be so designed and constructed that the supports in no case have protruding edges, and they shall meet one or other of the following conditions (see annex 10, explanatory notes, paragraph 5.2.3.).
5.2.3.1 The part facing into the vehicle shall present a surface not less than 25 mm high with edges rounded to a radius of curvature of not less than 3.2 mm. This surface shall consist of or be covered with an energy-dissipating material, as defined in annex 4 of this Regulation, and shall be tested in accordance therewith, the impact being applied in a horizontal longitudinal direction (see annex 10, explanatory notes, paragraph 5.2.3.1.).
5.2.3.2 Shelves and other similar items shall, under the effect of a forward-acting horizontal longitudinal force of 37.8 daN exerted by a cylinder of 110 mm diameter with its axis vertical, become detached, break up, be substantially distorted or retract without producing dangerous features on the rim of the shelf. The force must be directed at the strongest part of the shelves or other similar items (see annex 10, explanatory notes, paragraph 5.2.3.2.).
5.2.4 If the items in question contain a part made of material less than 50 shore A hardness when fitted to a rigid support, the above requirements, except for the requirements covered by annex 4 relating to energy-absorption shall apply only to the rigid support or it can be demonstrated by sufficient tests according to the procedure described in annex 4 that the soft material of less than 50 shore A hardness will not be cut so as to contact the support during the specified impact test. In that case the radius requirements shall not apply.
5.3. Other interior fittings in the passenger compartment in front of the transverse plane passing through the torso reference line of the manikin placed on the rearmost seats (see annex 10, explanatory notes, paragraph 5.3.)
5.3.1 Scope
The requirements of paragraph 5.3.2. below apply to control handles, levers and knobs and to any other protruding objects not referred to in paragraphs 5.1. and 5.2. above. (See also paragraph 5.3.2.2. )
5.3.2 Requirements
If the items referred to in paragraph 5.3.1. above are so placed that occupants of the vehicle can contact them, they shall meet the requirements of paragraphs 5.3.2.1. to 5.3.4. If they can be contacted by a 165 mm diameter sphere and are above the lowest "H" point (see annex 5 of this Regulation) of the front seats and forward of the transverse plane of the torso reference line of the manikin on the rearmost seat, and outside the zones defined in paragraphs 2.3.1. and 2.3.2., these requirements shall be considered to have been fulfilled if: (see annex 10, explanatory notes, paragraph 5.3.2.)
5.3.2.1 their surface terminates in rounded edges, the radii of curvature being not less than 3.2 mm (see annex 10, explanatory notes, paragraph 5.3.2.1.).
5.3.2.2 control levers and knobs shall be so designed and constructed that, under the effect of a forward acting longitudinal horizontal force of 37.8 daN either the projection in its most unfavourable position is reduced to not more than 25 mm from the surface of the panel or the said fittings become detached or bent; in the two latter cases no dangerous projections shall remain. Window winders may, however, project 35 mm from the surface of the panel (see annex 10, explanatory notes, paragraph 5.3.2.2.);
5.3.2.3 the handbrake control, when in the released position, and the gear lever, when in any forward gear position, have, except when placed in the zones defined in paragraphs 2.3.1. and 2.3.2. and in the zones below the horizontal plane passing through the "H" point of the front seats, a surface area of not less than 6.5 cm2 measured at a crosssection normal to the longitudinal horizontal direction up to a distance of 6.5 mm from the part projecting furthest, the radius of curvature being not less than 3.2 mm (see annex 10, explanatory notes, paragraph 5.3.2.3.).
5.3.3 The requirements in paragraph 5.3.2.3. shall not apply to a floor-mounted handbrake control; for such controls, if the height of any part in the released position is above a horizontal plane passing through the lowest "H" point of the front seats (see annex 5 of this Regulation) the control shall have a cross sectional area of at least 6.5 cm2 measured in a horizontal plane not more than 6.5 mm from the furthest projecting part (measured in the vertical direction). The radius of curvature shall not be less than 3.2 mm.
5.3.4 The other elements of the vehicle's equipment not covered by the above paragraph, such as seat slide rails, devices for regulating the horizontal or vertical part of the seat, devices for rolling up safety belts, etc. are not subject to any regulation if they are situated below a horizontal line passing through the "H" point of each seat even though the occupant is likely to come into contact with such elements (see annex 10, explanatory notes, paragraph 5.3.4.).
5.3.4.1 Components mounted on the roof, but which are not part of the roof structure, such as grab handles, lamps and sun visors, etc. shall have a radius of curvature not less than 3.2 mm. In addition, the width of the projecting parts shall not be less than the amount of their downward projection; alternatively these projecting parts shall pass the energydissipating test in accordance with the requirements of annex 4 (see annex 10, explanatory notes, paragraph 5.3.4.1.).
5.3.5 If the parts considered above comprise a component made of material of less than 50 shore A hardness, mounted on a rigid support, the above requirements shall apply only to the rigid support. or it can be demonstrated by sufficient tests according to the procedure described in annex 4 that the soft material of less than 50 shore A hardness will not be cut so as to contact the support during the specified impact test. In that case the radius requirements shall not apply.
5.3.6 In addition, power operated windows and partition systems and their controls shall meet the requirements of paragraph 5.8. below.
5.4 Roof (see annex 10, explanatory notes, paragraph 5.4.)
5.4.1 Scope
5.4.1.1 The requirements of paragraph 5.4.2. below apply to the inner face of the roof.
5.4.1.2 However, they do not apply to such parts of the roof as cannot be touched by a sphere 165 mm in diameter.
5.4.2 Requirements
5.4.2.1 That part of the inner face of the roof which is situated above or forward of the occupants shall exhibit no dangerous roughness at sharp edges, directed rearwards or downwards. The width of the projecting parts shall not be less than the amount of their downward projection and the edges shall have a radius of curvature of not less than 5 mm. In particular, the rigid roof sticks or ribs, with the exception of the header rail of the glazed surfaces and door frames, shall not project downwards more than 19 mm (see annex 10, explanatory notes, paragraph 5.4.2.1.).
5.4.2.2 If the roof sticks or ribs do not meet the requirements of paragraph 5.4.2.1. they shall pass the energy-dissipating test in accordance with the requirement of annex 4 to this Regulation.
5.4.2.3 The metal wires which stretch the lining of the roof and the frames of the sun visors shall have a maximum diameter of 5 mm or be able to absorb the energy, as prescribed in annex 4 to this Regulation. Non-rigid attachment elements of the frames of the sun visors shall meet the requirements of paragraph 5.3.4.1. above.
5.5 Vehicles with an opening roof (see annex 10, explanatory notes, paragraph 5.5.)
5.5.1 Requirements
5.5.1.1 The following requirements and those of paragraph 5.4. above shall apply to vehicles with an opening roof when the roof is in the closed position.
5.5.1.2 In addition, the opening and operating devices shall (see annex 10, explanatory notes, paragraphs 5.5.1.2., 5.5.1.2.1., and 5.5.1.2.2.):
5.5.1.2.1 be so designed and constructed as to exclude accidental or inopportune operation as far as possible (see annex 10, explanatory notes, paragraphs 5.5.1.2., 5.5.1.2.1., and 5.5.1.2.2.);
5.5.1.2.2 their surfaces shall terminate in rounded edges, the radii of curvature being not less than 5 mm (see annex 10, explanatory notes, paragraphs 5.5.1.2., 5.5.1.2.1., and 5.5.1.2.2.);
5.5.1.2.3 be accommodated, when in the position of rest, in areas which cannot be touched by a sphere 165 mm in diameter. If this condition cannot be met, the opening and operating devices shall, in the position of rest, either remain retracted or be so designed and constructed, that, under the effect of a force of 37.8 daN applied in the direction of impact defined in annex 4 to this Regulation as the tangent to the trajectory of the headform, either the projection as described in annex 6 to this Regulation shall be reduced to not more than 25 mm beyond the surface on which the devices are mounted or the devices shall become detached; in the latter case, no dangerous projections shall remain (see annex 10, explanatory notes, paragraph 5.5.1.2.3.).
5.5.2 In addition, power-operated roof-panel systems and their controls shall meet the requirements of paragraph 5.8. below.
5.6 Convertible vehicles (see annex 10, explanatory notes, paragraph 5.6.)
5.6.1 In the case of convertible vehicles, only the underside of the top of the roll-bar and the top of the windscreen frame in all its normal utilization positions shall comply with the requirements of paragraph 5.4. The system of folding rods or links used to support a non-rigid roof shall, where they are situated above and forward of the occupants, exhibit no dangerous roughness or sharp edges, directed rearwards or downwards (see annex 10, explanatory notes, paragraph 5.6.1.).
5.7 Rear parts of seats anchored to the vehicle
5.7.1 Requirements
5.7.1.1 The surface of rear parts of seats shall exhibit no dangerous roughness or sharp edges likely to increase the risk or severity of injury to the occupants (see annex 10, explanatory notes, paragraph 5.7.1.1.).
5.7.1.2 Except as provided in paragraphs 5.7.1.2.1., 5.7.1.2.2. and 5.7.1.2.3. below, that part of the back of the front seat which is in the head-impact zone defined in annex 1 of this Regulation shall be energy-dissipating, as prescribed in annex 4 to this Regulation. For determining the head-impact zone the front seats shall, if they are adjustable, be in the rearmost driving position with their backs inclined as near as possible to 25 degrees unless indicated otherwise by the manufacturer (see annex 10, explanatory notes, paragraph 5.7.1.2.).
5.7.1.2.1 In the case of separate front seats, the rear passengers' head-impact zone shall extend for 10 cm on either side of the seat centreline, in the top part of the rear of the seat-back.
5.7.1.2.1.1 In the case of seats fitted with head restraints, each test shall be carried out with the headrestraint in the lowest position and at a point situated on the vertical line passing through the centre of the head-restraint.
5.7.1.2.1.2 In the case of a seat which is designed to be fitted in several types of vehicle, the impact zone shall be determined by the vehicle whose rearmost driving seat position is, of each of the types considered, the least favourable; the resultant impact zone will be deemed adequate for the other types.
5.7.1.2.2 In the case of front bench seats, the impact zone shall extend between the longitudinal vertical planes 10 cm outboard of the centreline of each designated outboard seating position. The centreline of each outboard seating position of a bench seat shall be specified by the manufacturer.
5.7.1.2.3 In the head impact zone outside the limits prescribed in paragraphs 5.7.1.2.1. to 5.7.1.2.2. inclusive, the seat frame structure shall be padded to avoid direct contact of the head with it; and, in these zones, shall have a radius of curvature of at least 5 mm. These parts may alternatively satisfy the energy-dissipation requirements specified in annex 4 to this Regulation (see annex 10, explanatory notes, paragraph 5.7.1.2.3.).
5.7.2 These requirements shall not apply to the rearmost seats, to seats facing sideways or rearwards, to back-to-back seats or to folding (tip-up) seats. If the impact zones of the seats, head restraints and their supports contain parts covered with material softer than 50 shore A hardness, the above requirements, with the exception of those relating to energy-dissipation described in annex 4 to this Regulation, shall apply only to the rigid parts.
5.7.3 The requirements of paragraph 5. 7. shall be considered to be satisfied in the case of rear parts of seats that are part of a vehicle type approved under Regulation No. 17 (03 series of amendments or later).
5.8 Power-operation of windows, roof-panel systems and partition systems
5.8.1 The requirements below apply to power-operation of windows/roof-panel systems/ partition systems to minimize the possibility of injuries caused by accidental or improper operation.
5.8.2 Normal operating requirements
Except as provided in paragraph 5.8.3., power-operated windows/roof-panel systems/ partition systems may be closed under one or more of the following conditions:
5.8.2.1 when the ignition key is inserted in the ignition control in any position of use or in an equivalent condition in case of a non mechanical device;
5.8.2.2 when the power key has been used to activate the power supply to the power operated windows, partitions or roof panel systems;
5.8.2.3 by muscular force unassisted by power supply of the vehicle;
5.8.2.4 on continuous activation of a closing system located on the exterior of the vehicle;
5.8.2.5 during the interval of time between the moment the ignition has been switched off or the ignition key has been removed, or an equivalent condition has happened in case of a non mechanical device, and the moment that neither of the two front doors has been opened sufficiently to permit egress of occupants;
5.8.2.6 when the closing movement of a power-operated window, roof panel or partition starts at an opening not exceeding 4 mm;
5.8.2.7 when the power-operated window of a vehicle's door without an upper door frame closes automatically whenever the pertinent door is closed. In this case the maximum opening, as defined in paragraph 2.15., prior to window closing, shall not exceed 12 mm.
5.8.2.8 Remote closing shall be allowed by continuous activation of a remote actuation device, provided one of the following conditions is fulfilled:
5.8.2.8.1 the operation distance between the actuation device and the vehicle shall not exceed 6 m;
5.8.2.8.2 the operation distance between the actuation device and the vehicle shall not exceed 11 m, provided that the system requires a direct line of sight between the actuation device and the vehicle. This may be tested by placing an opaque surface between the actuation device and the vehicle.
5.8.2.9 One-touch closing shall be permitted only for the power-operated window of the driver's door and the roof panel, and only during the time when the ignition key is in the engine running position. It is also allowed when the engine has been switched off or the ignition key/power key has been removed, or an equivalent condition has happened in case of a non mechanical device, as long as neither of the two front doors has been opened sufficiently to permit egress of occupants.
5.8.3 Auto-reversing requirements
5.8.3.1 None of the requirements in item 5.8.2. shall apply, if a power-operated window/roof panel system/partition system is fitted with an auto-reversing device.
5.8.3.1.1 This device shall reverse the window/roof panel/partition before it exerts a pinch force of more than 100 N within the opening of 200 mm to 4 mm above the top edge of a power-operated window/partition or in front of the leading edge of a sliding roof panel and at the trailing edge of a tilting roof panel.
5.8.3.1.2 After such an auto-reversal, the window or roof panel or partition shall open to one of the following positions:
5.8.3.1.2.1 a position that permits a semi-rigid cylindrical rod of a diameter of 200 mm to be placed through the opening at the same contact point(s) used to determine the reversing behaviour in paragraph 5.8.3.1.1.;
5.8.3.1.2.2 a position that represents at least the initial position before closing was initiated;
5.8.3.1.2.3 a position at least 50 mm more open than the position at the time when reversing was initiated;
5.8.3.1.2.4 in the case of tilting motion of a roof panel, the maximum angular opening.
5.8.3.1.3 To check power-operated windows/roof-panel systems/partition systems with reversing devices as per paragraph 5.8.3.1.1., a measuring instrument/test rod shall be placed through the opening from the inside through to the exterior of the vehicle or, in the case of a partition system, from the rear part of the passenger compartment in such a way that the cylindrical surface of the rod contacts any part of the vehicle structure which forms the boundary of the window/roof-panel partition aperture. The force deflection ratio of the measuring instrument shall be 10 +/- 0.5 N/mm. The positions of the test rod (normally located perpendicular to the edge of the window/roof panel/partition and perpendicular to the closing direction) are illustrated in Figure 1 of annex 9 to this Regulation. The position of the test rod relative to the edge and the closing direction shall be kept throughout the test.
5.8.4 Switch location and operation
5.8.4.1 Switches of power-operated windows/roof panels/partitions shall be located or operated in such a way to minimize the risk of accidental closing. The switches shall require continuous actuation for closing except in the case of paragraphs 5.8.2.7., 5.8.2.9. or 5.8.3.
5.8.4.2 All rear-window, roof-panel and partition switches intended for use by occupants in the rear of the vehicle shall be capable of being switched off by a driver-controlled switch which is located forward of a vertical transverse plane passing through the R points of the front seats. The driver controlled switch is not required if a rear window, roof panel or partition is equipped with an auto-reversing device. If, however, the driver-controlled switch is present, it shall not be able to override the auto-reversing device or prevent lowering of the partition system. The driver-controlled switch shall be located so as to minimize any accidental manipulating. It shall be identified by the symbol shown in Figure 2 of annex 9 to this Regulation or an equivalent symbol, for example according to ISO 2575:1998 reproduced in figure 3 of annex 9 to this Regulation.
5.8.5 Protection devices
All protection devices which are used to prevent damage to the power source in the case of an overload or stalling shall reset themselves after the overload or the automatic switch off. After resetting of the protection devices, the motion in the closing direction shall not resume without a deliberate action on the control device.
5.8.6 Handbook instructions
5.8.6.1 The owner's manual of the vehicle shall contain clear instructions relating to the poweroperated window/roof panel/partition, including:
5.8.6.1.1 explanation of possible consequences (entrapment),
5.8.6.1.2 use of the driver-controlled switch,
5.8.6.1.3 a "WARNING" message indicating the dangers, particularly to children in the case of improper use/activation of the power-operated windows/roof-panel systems/partition systems. This information should indicate the responsibilities of the driver, including instructions for other occupants and the recommendation to leave the vehicle only if the ignition key/power key has been removed, or an equivalent condition has happened in case of a non mechanical device,
5.8.6.1.4 a "WARNING" message indicating that special care should be taken when using remote closing systems (see paragraph 5.8.2.8), for example to actuate it only when the operator has a clear view of the vehicle to be sure that nobody can be trapped by power-operated windows/roof-panel/partition equipment.
5.8.7 If a power-operated window, roof-opening and/ or partition system is installed in a vehicle that can not be tested according to the test procedures mentioned above the approval may be granted if the manufacturer can demonstrate an equal or improved protection-effect for the occupants.
5.9 Other non-specified fittings.
5.9.1 The requirements of paragraph 5. shall apply to such fittings not mentioned in previous paragraphs which, within the meaning of the various requirements in paragraphs 5.1. to 5.7. and according to their location in the vehicle, are capable of being contacted by the occupants. If such parts are made of a material of less than 50 shore A hardness, mounted on a rigid support, the requirements in question shall apply only to the rigid support, or it can be demonstrated by sufficient tests according to the procedure described in annex 4 that the soft material of less than 50 shore A hardness will not be cut during the specified impact test. In that case the required radius shall apply to the soft surface only.
5.9.2 For parts like a centre console, for example, or other components of the vehicle which belong to 5.9.1., it is not necessary to perform an energy dissipation test according to annex 4 to any component contactable by the device and procedure specified in annex 1 if:
in the opinion of the Technical Service the occupant's head is unlikely to contact the component, because of the restraint system(s) installed in the vehicle,
or,
because the manufacturer can prove the lack of such contact using, for example, the method described in annex 8, or any equivalent method.
6. MODIFICATIONS AND EXTENSION OF APPROVAL OF THE VEHICLE TYPE
6.1 Every modification of the vehicle type shall be notified to the administrative department which approved the vehicle type. The department may then either:
6.1.1 consider that the modifications made are unlikely to have an appreciable adverse effect and that in any case the vehicle still complies with the requirements; or
6.1.2 require a further test report from the technical service responsible for conducting the tests.
6.2 Confirmation or refusal of approval, specifying the alterations, shall be communicated by the procedure specified in paragraph 4.3. above to the Parties to the Agreement which apply this Regulation.
6.3 The competent authority issuing the extension of approval shall assign a series number for such an extension and inform thereof the other Parties to the 1958 Agreement applying this Regulation by means of a communication form conforming to the model in annex 2 to this Regulation.
7. CONFORMITY OF PRODUCTION
7.1 Every vehicle bearing an approval mark as prescribed under this Regulation shall conform to the vehicle type approved.
7.2 In order to verify conformity as prescribed in paragraph 7.1. above, a vehicle bearing the approval mark required by this Regulation shall be taken from the series.
7.3 Production shall be deemed to conform to the requirements of this Regulation if the requirements of paragraph 5. above are met.
8. PENALTIES FOR NON-CONFORMITY OF PRODUCTION
8.1 The approval granted in respect of a vehicle type pursuant to this Regulation may be withdrawn if the requirement laid down in paragraph 7.1. above is not complied with or if the vehicle fails to pass the checks prescribed in paragraph 7. above.
8.2 If a Party to the Agreement which applies this Regulation withdraws an approval it has previously granted, it shall forthwith so notify the other Contracting Parties applying this Regulation, by means of a communication form conforming to the model in annex 2 to this Regulation.
9. PRODUCTION DEFINITELY DISCONTINUED
If the holder of the approval completely ceases to manufacture a type of vehicle under this Regulation, he shall inform thereof the authority which granted the approval. Upon receiving the relevant communication, that authority shall inform the other Parties to the Agreement which apply this Regulation thereof by means of a communication form conforming to the model in annex 2 to this Regulation.
10. NAMES AND ADDRESSES OF TECHNICAL SERVICES RESPONSIBLE FOR CONDUCTING APPROVAL TESTS, AND OF ADMINISTRATIVE DEPARTMENTS
The Parties to the Agreement applying this Regulation shall communicate to the United Nations Secretariat the names and addresses of the technical services responsible for conducting approval tests and of the administrative departments which grant approval and to which forms certifying approval or refusal or withdrawal of approval, issued in other countries, are to be sent.
Annex l
DETERMINATION OF THE HEAD-IMPACT ZONE
- The head-impact zone comprises all the non-glazed surfaces of the interior of a vehicle which are capable of entering into static contact with a spherical head 165 mm in diameter that is an integral part of a measuring apparatus whose dimension from the pivotal point of the hip to the top of the head is continuously adjustable between 736 mm and 840 mm.
- The aforesaid zone shall be determined by the following procedure or its graphic equivalent:
- The pivotal point of the measuring apparatus shall be placed as follows for each seating position for which the manufacturer has made provision:
- In the case of sliding seats:
- at the "H" point (see annex 5), and
- at a point situated horizontally 127 mm forward of the "H" point and either at a height resulting from the variation in the height of the "H" point caused by a forward shift of 127 mm or 19 mm (see annex 10, explanatory notes to paragraph 2.1.1.2. of annex 1).
- In the case on non-sliding seats:
- at the "H" point of the seat considered.
- All points of contact situated forward of the "H" point shall be determined, for each dimension from the pivoted point to the top of the head capable of being measured by the measuring apparatus within the interior dimensions of the vehicle (see annex 10, explanatory notes to paragraph 2.2. of annex 1).
- In the case where the headform, with the arm set at minimum length, overlaps the front seat, from the rear "H" point, no contact point is established for this particular operation.
- With measuring apparatus vertical, possible points of contact shall be determined by pivoting it forwards and downwards through all arcs of vertical planes as far as 90 degrees on either side of the longitudinal vertical plane of the vehicle which passes through the "H" point.
- To determine the points of contact, the length of the arm of the measuring apparatus shall not be changed during any given excursion. Each excursion shall start from a vertical position.
- A "point of contact" is a point at which the head of the apparatus touches a part of the interior of the vehicle. The maximum downward movement shall be downward movement to a position where the head is tangential to a horizontal plane situated 25.4 mm above the "H" point.
Annex 2
COMMUNICATION
(maximum format: A4 (210 x 297 mm))
 issued by: Name of administration:
......................................
......................................
......................................
concerning 2/: APPROVAL GRANTED
APPROVAL EXTENDED
APPROVAL REFUSED
APPROVAL WITHDRAWN
PRODUCTION DEFINITELY DISCONTINUED
of a type of pneumatic tyre for motor vehicles pursuant to Regulation No. 21
Approval No. ..... Extension No. .....
1. Trade name or trade mark of the vehicle .........................................
2. Vehicle type ...............................................................
3. Manufacturer's name and address ..............................................
4. If applicable, name and address of manufacturer's representative ......................
.........................................................................
5. Vehicle submitted for approval on ..............................................
6. Technical service responsible for conducting approval tests ........................
7. Date of test report .........................................................
8. Number of test report.......................................................
9. Remarks: Type of vehicle (sedan, station wagon) ................................
10. Position of the approval mark ................................................
11. Approval granted/extended/refused/withdrawn 2/
12. Reason(s) of the extension (if applicable)
13. Place: ...................................................................
14. Date: ...................................................................
15. Signature: ................................................................
The list of documents deposited at the Administrative Services which has granted approval is annexed to this communication and may be obtained on request.
_______________
1/ Distinguishing number of the country which has granted/extended/refused/withdrawn approval (see approval provisions in the Regulation).
2/ Strike out what does not apply.
Annex 3
ARRANGEMENTS OF THE APPROVAL MARK
Model A
(See paragraph 4.4. of this Regulation)

The above approval mark affixed to a vehicle shows that the vehicle type concerned has, with regard to its interior fittings, been approved in the Netherlands (E 4), under the number 012439. The first two digits of the approval number indicate that the approval was granted in accordance with the requirements of Regulation No. 21 as amended by the 01 series of amendments.
Model B
(See paragraph 4.5. of this Regulation)

The above approval mark affixed to a vehicle shows that the vehicle type concerned has been approved in the Netherlands (E 4) pursuant to Regulations Nos. 21 and 33. The first two digits of the approval numbers indicate that, on the date on which these approvals were granted, Regulation No. 21 included the 01 series of amendments and Regulation No. 33 was still in its original form.
Annex 4
PROCEDURE FOR TESTING ENERGY-DISSIPATING MATERIALS
- Setting up ; test apparatus; procedure
- Setting up
- The component made of energy-dissipating materials shall be mounted and tested on the structural supporting member on which it is to be installed on the vehicle. The test shall preferably be carried out, where possible, directly on the body. The structural member, or the body, shall be firmly attached to the test bench so that it does not move under impact.
- However, at the manufacturer's request, the component may be mounted on a fitting simulating installation on the vehicle, on condition that the assembly comprising the component and the fitting has the same geometrical arrangement as, and a degree of rigidity not lower and an energy-dissipating capacity not higher than those of the real assembly comprising the component and the structural supporting member.
- Test apparatus
- This apparatus consists of a pendulum whose pivot is supported by ball-bearings and whose reduced mass at its centre of percussion is 6.8 kg. The lower extremity of the pendulum consists of a rigid headform 165 mm in diameter whose centre is identical with the centre of percussion of the pendulum.
- The headform shall be fitted with two accelerometers and a speed transducer, all capable of measuring values in the direction of impact.
- Recording instruments
The recording instruments used shall be such that measurements can be made with the following degrees of accuracy:
1.3.1 Acceleration:
accuracy = +/- 5 % of the real value;
frequency response = up to 1,000 Hz;
cross axis sensitivity = > 5 % of the lowest point on the scale.
1.3.2 Speed :
accuracy = +/- 2.5 % of real value;
sensitivity = 0.5 km/h.
1.3.3 Time recording :
the instrumentation shall enable the action to be recorded throughout its duration and readings to be made to within one thousandth of a second;
the beginning of the impact at the moment of first contact between the headform and the test component shall be noted on the recordings used for analysing the test.
1.4 Test procedure (see annex 10, explanatory notes to paragraph 1.4. of annex 4)
1.4.1 At every point of impact on the surface to be tested the direction of impact is the tangent to the trajectory of the headform of the measuring apparatus defined in annex l.
1.4.1.1 For testing the parts, as referred to in paragraphs 5.3.4.1. and 5.4.2.2. of this Regulation, the arm of the measuring apparatus shall be lengthened until contact is made with the part to be considered, up to a limit of 1,000 mm between the pivot point and the top of the head of the apparatus. However, any roof sticks or ribs referred to in paragraph 5.4.2.2. which cannot be contacted shall remain subject to the requirements of paragraph 5.4.2.1. of this Regulation, with the exception of that relating to the height of the projection.
1.4.2 Where the angle between the direction of impact and the perpendicular to the surface at the point of impact is 5 degrees or less, the test shall be carried out in such a way that the tangent to the trajectory of the centre of percussion of the pendulum coincides with the direction of impact. The headform shall strike the test component at a speed of 24.1 km/h or, in the case of components which cover an uninflated airbag, at a speed of 19.3 km/h; this speed shall be achieved either by the mere energy of propulsion or by using an additional impelling device.
1.4.3 Where the angle between the direction of impact and the perpendicular to the surface at the point of impact is more than 5 degrees, the test may be carried out in such a way that the tangent to the trajectory of the centre of percussion of the pendulum coincides with the perpendicular to the point of impact. The test speed shall then be reduced to the value of the normal component of the speed prescribed in paragraph 1.4.2.
2. Results
2.1 In tests carried out according to the above procedures, the deceleration of the headform shall not exceed 80 g continuously for more than 3 milliseconds. The deceleration rate taken shall be the average of the readings of the two decelerometers.
3. Equivalent procedures
3.1 Equivalent test procedures shall be permitted on condition that the results required in paragraph 2. above can be obtained.
3.2 Responsibility for demonstrating the equivalence of a method other than that described in paragraph l. shall rest with the person using such a method.
Annex 5
PROCEDURE FOR DETERMINING THE "H" POINT AND THE ACTUAL TORSO ANGLE FOR SEATING POSITIONS IN MOTOR VEHICLES
- PURPOSE
The procedure described in this annex is used to establish the "H" point location and the actual torso angle for one or several seating positions in a motor vehicle and to verify the relationship of measured data to design specifications given by the vehicle manufacturer.
2. DEFINITIONS
For the purposes of this annex:
2.1 "Reference data" means one or several of the following characteristics of a seating position:
2.1.1 the "H" point and the "R" point and their relationship,
2.1.2 the actual torso angle and the design torso angle and their relationship.
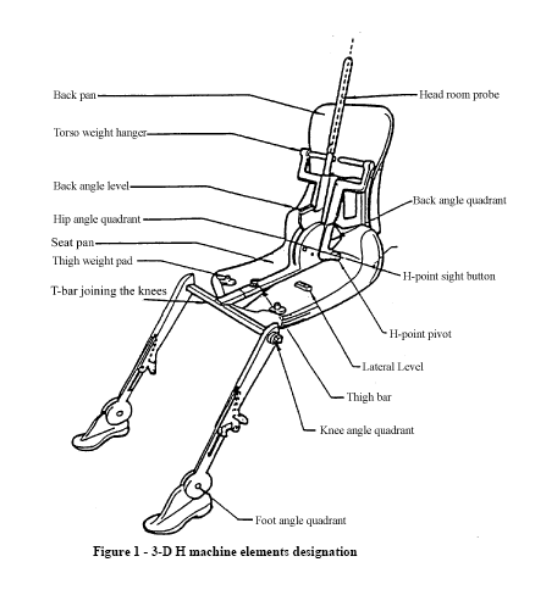
2.2 "Three-dimensional 'H' point machine" (3-D H machine) means the device used for the determination of "H" points and actual torso angles. This device is described in appendix 1 to this annex;
2.3 "'H' point" means the pivot centre of the torso and the thigh of the 3-D H machine installed in the vehicle seat in accordance with paragraph 4 below. The "H" point is located in the centre of the centreline of the device which is between the "H" point sight buttons on either side of the 3-D H machine. The "H" point corresponds theoretically to the "R" point (for tolerances see paragraph 3.2.2. below) . Once determined in accordance with the procedure described in paragraph 4, the "H" point is considered fixed in relation to the seat-cushion structure and to move with it when the seat is adjusted;
2.4 "'R' point" or "seating reference point" means a design point defined by the vehicle manufacturer for each seating position and established with respect to the threedimensional reference system;
2.5 "Torso-line" means the centreline of the probe of the 3-D H machine with the probe in the fully rearward position;
2.6 "Actual torso angle" means the angle measured between a vertical line through the "H" point the torso line using the back angle quadrant on the 3-D H machine. The actual torso angle corresponds theoretically to the design torso angle (for tolerances see paragraph 3.2.2. below):
2.7 "Design torso angle" means the angle measured between a vertical line through the "R" point and the torso line in a position which corresponds to the design position of the seatback established by the vehicle manufacturer;
2.8 "Centreplane of occupant" (C/LO) means the median plane of the 3-D H machine positioned in each designated seating position; it is represented by the coordinate of the "H" point on the "Y" axis.
For individual seats, the centreplane of the seat coincides with the centreplane of the occupant. For other seats, the centreplane of the occupant is specified by the manufacturer;
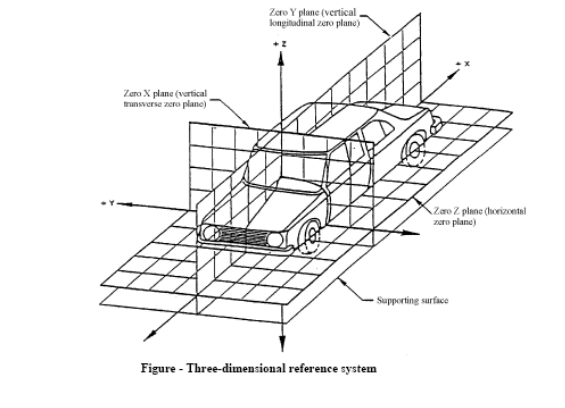
2.9 "Three-dimensional reference system" means a system as described in appendix 2 to this annex;
2.10 "Fiducial marks" are physical points (holes, surfaces, marks or indentations) on the vehicle body as defined by the manufacturer;
2.11 "Vehicle measuring attitude" means the position of the vehicle as defined by the coordinates of fiducial marks in the three-dimensional reference system.
3. REQUIREMENTS
3.1 Data presentation
For each seating position where reference data are required in order to demonstrate compliance with the provisions of the present Regulation, all or an appropriate selection of the following data shall be presented in the form indicated in appendix 3 to this annex:
3.1.1 the coordinates of the "R" point relative to the three-dimensional reference system;
3.1.2 the design torso angle;
3.1.3 all indications necessary to adjust the seat (if it is adjustable) to the measuring position set out in paragraph 4.3. below.
3.2 Relationship between measured data and design specifications
3.2.1 The coordinates of the "H" point and the value of the actual torso angle obtained by the procedure set out in paragraph 4 below shall be compared, respectively, with the coordinates of the "R" point and the value of the design torso angle indicated by the vehicle manufacturer.
3.2.2 The relative positions of the "R" point and the "H" point and the relationship between the design torso angle and the actual torso angle shall be considered satisfactory for the seating position in question if the "H" point, as defined by its coordinates, lies within a square of 50 mm side length with horizontal and vertical sides whose diagonals intersect at the "R" point, and if the actual torso angle is within 5 degrees of the design torso angle.
3.2.3 If these conditions are met, the "R" point and the design torso angle, shall be used to demonstrate compliance with the provisions of this Regulation.
3.2.4 If the "H" point or the actual torso angle does not satisfy the requirements of paragraph 3.2.2. above, the "H" point and the actual torso angle shall be determined twice more (three times in all). If the results of two of these three operations satisfy the requirements, the conditions of paragraph 3.2.3. above shall apply.
3.2.5 If the results of at least two of the three operations described in paragraph 3.2.4. above do not satisfy the requirements of paragraph 3.2.2. above, or if the verification cannot take place because the vehicle manufacturer has failed to supply information regarding the position of the "R" point or regarding the design torso angle, the centroid of the three measured points or the average of the three measured angles shall be used and be regarded as applicable in all cases where the "R" point or the design torso angle is referred to in this Regulation.
4. PROCEDURE FOR "H" POINT AND ACTUAL TORSO ANGLE DETERMINATION (see annex 10, explanatory notes to paragraph 4. of annex 5)
4.1 The vehicle shall be preconditioned at the manufacturer's discretion, at a temperature of 20 +/-10 degrees C to ensure that the seat material reached room temperature. If the seat to be checked has never been sat upon, a 70 to 80 kg person or device shall sit on the seat twice for one minute to flex the cushion and back. At the manufacturer's request, all seat assemblies shall remain unloaded for a minimum period of 30 min prior to installation of the 3-D H machine.
4.2 The vehicle shall be at the measuring attitude defined in paragraph 2.11. above.
4.3 The seat, if it is adjustable, shall be adjusted first to the rearmost normal driving or riding position, as indicated by the vehicle manufacturer, taking into consideration only the longitudinal adjustment of the seat, excluding seat travel used for purposes other than normal driving or riding positions. Where other modes of seat adjustment exist (vertical, angular, seat-back, etc.) these will then be adjusted to the position specified by the vehicle manufacturer. For suspension seats, the vertical position shall be rigidly fixed corresponding to a normal driving position as specified by the manufacturer.
4.4 The area of the seating position contacted by the 3-D H machine shall be covered by a muslin cotton, of sufficient size and appropriate texture, described as a plain cotton fabric having 18.9 threads per cm2 and weighing 0.228 kg/m2 or knitted or non-woven fabric having equivalent characteristics. If test is run on a seat outside the vehicle, the floor on which the seat is placed shall have the same essential characteristics as the floor of the vehicle in which the seat is intended to be used.
4.5 Place the seat and back assembly of the 3-D H machine so that the centreplane of the occupant (C/LO) coincides with the centreplane of the 3-D H machine. At the manufacturer's request, the 3-D H machine may be moved inboard with respect to the C/ LO if the 3-D H machine is located so far outboard that the seat edge will not permit levelling of the 3-D H machine.
4.6 Attach the foot and lower leg assemblies to the seat pan assembly, either individually or by using the T-bar and lower leg assembly. A line through the "H" point sight buttons shall be parallel to the ground and perpendicular to the longitudinal centreplane of the seat.
4.7 Adjust the feet and leg positions of the 3-D H machine as follows:
4.7.1 Designated seating position: driver and outside front passenger
4.7.1.1 Both feet and leg assemblies shall be moved forward in such a way that the feet take up natural positions on the floor, between the operating pedals if necessary. Where possible the left foot shall be located approximately the same distance to the left of the centreplane of the 3-D H machine as the right foot is to the right. The spirit level verifying the transverse orientation of the 3-D H machine is brought to the horizontal by readjustment of the seat pan if necessary, or by adjusting the leg and foot assemblies towards the rear. The line passing through the "H" point sight buttons shall be maintained perpendicular to the longitudinal centreplane of the seat.
4.7.1.2 If the left leg cannot be kept parallel to the right leg and the left foot cannot be supported by the structure, move the left foot until it is supported. The alignment of the sight buttons shall be maintained.
4.7.2 Designated seating position: outboard rear
For rear seats or auxiliary seats, the legs are located as specified by the manufacturer. If the feet then rest on parts of the floor which are at different levels, the foot which first comes into contact with the front seat shall serve as a reference and the other foot shall be so arranged that the spirit level giving the transverse orientation of the seat of the device indicates the horizontal.
4.7.3 Other designated seating positions:
The general procedure indicated in paragraph 4.7.1. above shall be followed except that the feet shall be placed as specified by the vehicle manufacturer.
4.8 Apply lower leg and thigh weights and level the 3-D H machine.
4.9 Tilt the back pan forward against the forward stop and draw the 3-D H machine away from the seat-back using the T-bar. Reposition the 3-D H machine on the seat by one of the following methods:
4.9.1 If the 3-D H machine tends to slide rearward, use the following procedure. Allow the 3-D H machine to slide rearward until a forward horizontal restraining load on the T-bar is no longer required i.e. until the seat pan contacts the seat-back. If necessary, reposition the lower leg.
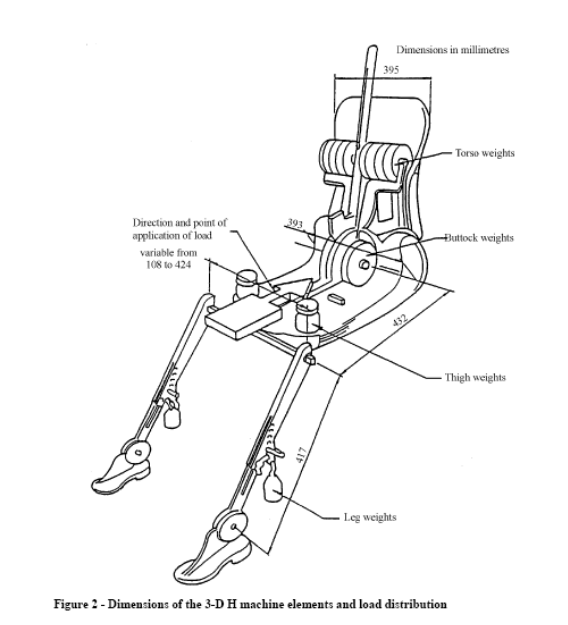
4.9.2 If the 3-D H machine does not tend to slide rearward, use the following procedure. Slide the 3-D H machine rearwards by applying a horizontal rearward load to the T-bar until the seat pan contacts the seat-back (see figure 2 of appendix 1 to this annex).
4.10 Apply a 100 +/- 10 N load to the back and pan assembly of the 3-D H machine at the intersection of the hip angle quadrant and the T-bar housing. The direction of load application shall be maintained along a line passing by the above intersection to a point just above the thigh bar housing (see figure 2 of appendix 1 to this annex). Then carefully return the back pan to the seat-back. Care must be exercised throughout the remainder of the procedure to prevent 3-D H machine from sliding forward.
4.11 Install the right and left buttock weights and then, alternately, the eight torso weights. Maintain the 3-D H machine level.
4.12 Tilt the back pan forward to release the tension on the seat-back. Rock the 3-D H machine from side to side through 10 degrees arc (5 degrees to each side of the vertical centreplane) for three complete cycles to release any accumulated friction between the 3-D H machine and the seat.
During the rocking action, the T-bar of the 3-D H machine may tend to diverge from the specified horizontal and vertical alignment. The T-bar must therefore be restrained by applying an appropriate lateral load during the rocking motions. Care shall be exercised in holding the T-bar and rocking the 3-D H machine to ensure that no inadvertent exterior loads are applied in a vertical or fore and aft direction.
The feet of the 3-D H machine are not to be restrained or held during this step. If the feet change position, they should be allowed to remain in that attitude for the moment.
Carefully return the back pan to the seat-back and check the two spirit levels for zero position. If any movement of the feet has occurred during the rocking operation of the 3-D H machine, they must be repositioned as follows:
Alternatively, lift each foot off the floor the minimum necessary amount until no additional foot movement is obtained. During this lifting, the feet are free to rotate; and no forward or lateral loads are to be applied. When each foot is placed back in the down position, the heel is to be in contact with the structure designed for this.
Check the lateral spirit level for zero position; if necessary, apply a lateral load to the top of the back pan sufficient to level the 3-D H machine’s seat pan on the seat.
4.13 Holding the T-bar to prevent the 3-D H machine from sliding forward on the seat cushion, proceed as follows:
(a) return the back pan to the seat-back;
(b) alternately apply and release a horizontal reward load, not to exceed 25 N, to the back angle bar at a height approximately at the centre of the torso weights until the hip angle quadrant indicates that a suitable position has been reached after load release. Care shall be exercised to ensure that no exterior downward or lateral loads are applied to the 3-D H machine. If another level adjustment of the 3-D H machine is necessary, rotate the back pan forward, re-level, and repeat the procedure from paragraph 4.12.
4.14 Take all measurements:
4.14.1 The coordinates of the “H” point are measured with respect to the three-dimensional reference system.
4.14.2 The actual torso angle is read at the back angle quadrant of the 3-D H machine with the probe in its fully rearward position.
4.15 If a re-run of the installation of the 3-D H machine is desired, the seat assembly should remain unloaded for a minimum period of 30 min prior to the re-run. The 3-D H machine should not be left loaded on the seat assembly longer than the time required to perform the test.
4.16 If the seats in the same row can be regarded as similar (bench seat, identical seat, etc.) only on “H” point and one “actual torso angle” shall be determined for each row of seats, the 3-D H machine described in appendix 1 to this annex being sealed in a place regarded as representative for the row. This place shall be:
4.16.1 in the case of the front row, the driver’s seat;
4.16.2 in the case of the rear row or rows, an outer seat.
Annex 5 - Appendix 1
DESCRIPTION OF THE THREE-DIMENSIONAL "H" POINT MACHINE (3-D H machine)
- Back and seat pans
The back and seat pans are constructed of reinforced plastic and metal; they simulate the human torso and thigh and are mechanically hinged at the "H" point. A quadrant is fastened to the probe hinged at the "H" point to measure the actual torso angle. An adjustable thigh bar, attached to the seat pan, establishes the thigh centreline and serves as a baseline for the hip angle quadrant.
2. Body and leg elements
Lower leg segments are connected to the seat pan assembly at the T-bar joining the knees, which is a lateral extension of the adjustable thigh bar. Quadrants are incorporated in the lower leg segments to measure knee angles. Shoe and foot assemblies are calibrated to measure the foot angle. Two spirit levels orient the device in space. Body element weights are placed at the corresponding centres of gravity to provide seat penetration equivalent to a 76 kg male. All joints of the 3-D H machine should be checked for free movement without encountering noticeable friction.


Annex 5 - Appendix 2
THREE-DIMENSIONAL REFERENCE SYSTEM
3. The three-dimensional reference system is defined by three orthogonal planes established by the vehicle manufacturer (see figure).
4. The vehicle measuring attitude is established by positioning the vehicle on the supporting surface such that the coordinates of the fiducial marks correspond to the values indicated by the manufacturer.
5. The coordinates of the "R" point and the "H" point are established in relation to the fiducial marks defined by the vehicle manufacturer.

Annex 5 - Appendix 3
REFERENCE DATA CONCERNING SEATING POSITIONS
- Coding of reference data
Reference data are listed consecutively for each seating position. Seating positions are identified by a two-digit code. The first digit is an Arabic numeral and designates the row of seats, counting from the front to the rear of the vehicle. The second digit is a capital letter which designates the location of the seating position in a row, as viewed in the direction of forward motion of the vehicle; the following letters shall be used:
L=left
C=centre
R=right
2. Description of vehicle measuring attitude
2.1 Coordinates of fiducial marks
X..............................................................................................................................
Y..............................................................................................................................
Z...............................................................................................................................
3. List of reference data
3.1 Seating position:...............................................................................................
3.1.1 Coordinates of "R" point
X..............................................................................................................................
Y..............................................................................................................................
Z...............................................................................................................................
3.1.2. Design torso angle:...................................................................................................
3.1.3. Specifications for seat adjustment
horizontal: .............................................................................................................
vertical: ...................................................................................................................
angular: ...................................................................................................................
torso angle: .............................................................................................................
Note: List reference data for further seating positions under 3.2., 3.3., etc.
Annex 6
METHOD OF MEASURING PROJECTIONS
- To determine the amount by which an item projects in relation to the panel on which it is mounted, a 165 mm diameter sphere shall be moved along and be kept in contact with the component under consideration, starting from the initial position of contact with the component under consideration. The projection's value is the largest of all possible variations "y", the variation measured from the centre of the sphere perpendicular to the panel.
1.1 If the panels and components, etc., are covered with materials softer than 50 shore A hardness, the procedure for measuring the projections described above shall apply only after removal of such materials.
2. The projection of switches, pull-knobs, etc., situated in the reference area shall be measured by using the test apparatus and procedures described below:
2.1 Apparatus
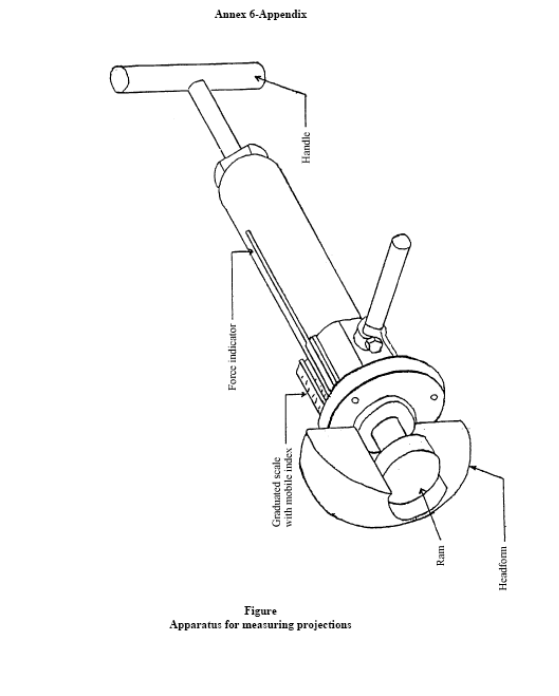
2.1.1 The apparatus for measuring projections shall consist of a hemispherical headform 165 mm in diameter in which there is a sliding ram of 50 mm diameter.
2.1.2 Relative positions of the flat end of the ram and the edge of the headform shall be shown as a graduated scale on which a mobile index shall register the maximum measurement achieved when the apparatus is moved away from the item tested. A minimum distance of 30 mm shall be measurable; the measuring scale shall be graduated in halfmillimetres to make possible an indication of the extent of the projections in question.
2.1.3 Gauging procedure
2.1.3.1 The apparatus shall be placed on a flat surface so that its axis is perpendicular to that surface. When the flat end of the ram contacts the surface, the scale shall be set at zero.
2.1.3.2 A 10 mm strut shall be inserted between the flat end of the ram and the retaining surface; a check shall be made to ensure that the mobile index records this measurement.
2.1.4 The apparatus for measuring projections is illustrated in the figure of the appendix to this annex.
2.2 Test procedure
2.2.1 A cavity shall be formed in the headform by pulling back the ram and the mobile index shall be placed against the ram.
2.2.2 The apparatus shall be applied to the projection to be measured so that the headform contacts the maximum surrounding surface area with a force not exceeding 2 daN.
2.2.3 The ram shall be pushed forward until it makes contact with the projection to be measured and the amount of the projection shall be observed on the scale.
2.2.4 The headform shall be adjusted to obtain maximum projection. The amount of the projection shall be recorded.
2.2.5 If two or more controls are situated sufficiently close for the ram or the headform to contact them simultaneously, they shall be treated as follows:
2.2.5.1 Multiple controls, all of which can be contained in the headform cavity, shall be regarded as forming a single projection.
2.2.5.2 If other controls prevent normal testing by contacting the headform, they shall be removed and the test shall be conducted without them. They may subsequently be reinstalled and tested in their turn with other controls that have been removed to facilitate the procedure.

Annex 7
APPARATUS AND PROCEDURE FOR APPLICATION OF PARAGRAPH 5.2.1. OF THIS REGULATION
Those parts (switches, pull-knobs, etc.) which can be contacted by using the apparatus and procedure described below shall be considered as being likely to be contacted by the knees of an occupant. Footoperated controls are fitted as foot pedals.
- Apparatus
1.1 Diagram of apparatus

2. Procedure
The apparatus may be placed in any position below the level of the instrument panel so that:
2.1 the plane XX' remains parallel to the median longitudinal plane of the vehicle;
2.2 the axis X can be rotated above and below the horizontal through angles up to 30 degrees.
3. In carrying out the above test, all materials of less than 50 shore A hardness shall be removed.
Annex 8
DETERMINATION OF A DYNAMICALLY DETERMINED HEAD IMPACT ZONE
- Determination of the dynamically determined head impact zone with regard to the protective system
1.1 Differing from the procedure described in annex 1 the applicant may prove, by a procedure accepted by the technical service responsible for conducting the tests, that a dynamically determined head impact zone is relevant for this vehicle type.
1.2 A suitable method to prove a dynamically determined head impact zone may be either:
1.2.1 Vehicle impact tests to determine the sequence of movement of the occupants with regard to the protective system installed in the vehicle type, using the frontal impact conditions in the range of +/- 30 degrees against a fixed rigid barrier with an impact speed of at least 48.3 km/h. Normally it will be sufficient to test at 0 degrees, + 30 degrees and - 30 degrees. The dynamically determined head impact zone has to be evaluated for the occupants represented by adult dummies of the types 5th percentile female, 50th percentile male and 95th percentile male, each placed in its recommended seating position before the test as defined by the manufacturer, or
1.2.2 Sled tests
The sequence of movement shall be investigated under the effect of the decelerationtime diagram as shown in annex 8 of Regulation No. 16 (change of velocity 50 km/h) respecting the above prescribed dummy family and producing a direction of a forward displacement of the respective dummies corresponding to the movement of the dummies during real frontal impact tests according to paragraph 1.2.1.
The direction of the forward displacement of the dummies is deemed satisfactory, if the centre line of the test object, normally a body shell, covers the range of +/- 18 degrees from the longitudinal centreline of the sled. Normally it will be sufficient to test at 0 degrees, + 18 degrees and -18 degrees, or
1.2.3 Simulated impact testing
The sequence of movements of the occupants, represented by the dummy family described in paragraph 1.2.1. above shall be investigated as described in paragraphs 1.2.1. or 1.2.2. above. The simulation method shall be validated by at least three of the impact conditions as prescribed in paragraphs 1.2.1. or 1.2.2. above.
2. The dynamically determined head impact zone includes all areas of the instrument panel that may be contacted by the head of restraint occupants using the protective system installed in the vehicle type.
3. If the vehicle type can be fitted with different protective systems it is sufficient to investigate the protective system with the minimum performance. However, protective systems that can be deactivated by the driver or the occupant have to be set as recommended and indicated by the manufacturer in the owners handbook.
If the manufacturer provide for permanent deactivation of a part of the protective system, then this part has to be set to the deactivated configuration.
4. The manufacturer or his representative is entitled to present calculations, simulations, test data or test results which sufficiently prove the dynamically determined head impact zone.
Annex 9
TYPICAL POSITION OF CYLINDRICAL TEST ROD IN THE OPENING ROOF AND WINDOW OPENINGS


EXAMPLES OF SYMBOLS FOR DRIVER CONTROLLED SWITCH

FIGURE 2

FIGURE 3
(ISO 2575:1998)
Annex 10
EXPLANATORY NOTES
Paragraph 2.3.
The reference zone is outlined without rear view mirror. The energy-dissipation test is accomplished without the rear view mirror. The pendulum shall not impact the mirror mounting.
Paragraphs 2.3. and 2.3.1.
The exempted area behind the steering wheel as defined by these paragraphs is also valid for the head impact area of the front passengers.
In the case of adjustable steering wheels the zone finally exempted is reduced to the common area of the exempted zones for each of the driving positions which the steering wheel may assume.
In the case where it is possible to choose between various steering wheels the exempted zone is determined by the use of the least favourable steering wheel having the smallest diameter.
Paragraph 2.4.
The level of the instrument panel extends over the entire width of the passenger compartment and is defined by the rearmost points of contact of a vertical line with the surface of the instrument panel when the line is moved across the width of the vehicle. Where two or more points of contact occur simultaneously, the lower point of contact shall be used to establish the level of the instrument panel. In the case of consoles, if it is not possible to determine the level of the instrument panel by reference to the points of contact of a vertical line the level of the instrument panel shall be where a horizontal line 25.4 mm above the "H" point of the front seats intersects the console.
Paragraph 2.5.
At the vehicle sides the roof shall commence at the upper edge of the door aperture. In the normal case, the lateral roof limits will be represented by the contours formed by the bottom edge (lateral view) of the remaining body when the door has been opened. In the case of windows, the lateral limitation of the roof will be the continuous transparent line (penetration point of the lateral windowpanes). At the posts, the lateral roof limitation will pass through the connecting line between the transparent lines. The definition of paragraph 2.5. is also valid for any opening for the roof, in the closed position, of a vehicle as defined in paragraphs 2.7. or 2.8. For measuring purposes, downward facing flanges shall be ignored. These will be considered as forming part of the vehicle sidewall.

Paragraph 2.7.
A non-removable rear window is understood to be a rigid structural element.
Cars with non-removable rear windows of rigid material are considered to be cars with opening roofs as defined under paragraph 2. 8.
Paragraph 2.18.
In case of a gap between the edge of a rigid material and the panel, this edge shall be rounded to a minimum radius of curvature depending on the gap shown in the table in the explanatory note to paragraph 5.1.1. This also applies, if the height of the projection, determined according to the procedure described in paragraph 1. of annex 6, is equal or less than 3.2 mm.
If the gap is located in a zone where a head impact test has to be carried out, the edges which can be contacted during the test(s) resulting from displacement of parts shall be protected by a minimum radius of 2.5 mm
Paragraph 5.1.1.
A sharp edge is an edge of a rigid material having a radius of curvature of less than 2.5 mm except in the case of projections of less than 3.2 mm, measured from the panel. In this case, the minimum radius of curvature shall not apply provided the height of the projection is not more than half its width and its edges are blunted.
Grills are considered to comply with the regulations if they meet the minimum requirements of the following table:
Gap between elements [mm] | Flat elements | Rounded elements min. radius [mm] |
e/min. [mm] | min. radius [mm] |
| | | |
10 – 15 | 2.0 | 0.33 | 0.75 |
15 - 20 | 3.0 | 0.50 | 1.25 |

Paragraph 5.1.2.
During the test, it is determined whether parts within the impact zone used for reinforcement may be displaced or protrude so as to increase the hazards to passengers or the severity of injuries.
Paragraph 5.1.3.
These two concepts (level and lower edge of the instrument panel) may be distinct.
However, this point is included in paragraph 5.1. ( .... above the level of the instrument panel ...) and, therefore is applicable only where these two concepts are combined. In the case where the two concepts are not combined, i.e. where the bottom edge of the instrument panel is located below the level of the instrument panel, it will be considered under paragraph 5.3.2.1. by reference to paragraph 5.8.
Paragraph 5.1.4.
If a pull handle or knob has a width dimension equal to or more than 50 mm and is located in a zone such that if it were less than 50 mm in width the maximum projection would be determined using the headform measuring apparatus of annex 6, paragraph 2. The maximum projection shall be determined in accordance with annex 6, paragraph 1. , i.e. by using a 165 mm diameter sphere and determining the maximum variation in height of the "y" axis. The cross-sectional area shall be measured in a plane parallel to the surface on which the component is mounted.
Paragraph 5.1.5.
Paragraphs 5.1.4. and 5.1.5. complement each other; the first sentence of paragraph 5.1.5. (i.e. a force of 37.8 daN for retraction or detachment) is applied and then paragraph 5.1.4. in case of retraction up to a protrusion between 3.2 and 9.5 mm or, in the case of detachment, the two last sentences of paragraph 5.1.5. (the cross-section area is measured before the force is applied). However, if, under practical circumstances paragraph 5.1.4. must be applied (retraction to under 9.5 mm and over 3.2 mm) it could be more convenient, at the manufacturer' s discretion, to verify the specifications of paragraph 5.1.4. before applying the force of 37.8 daN specified in paragraph 5.1.5.
     Force Force
retraction detachment to under remaining area 9.5 mm part ≤ 9.5 mm paragraph 5.1.4. paragraph 5.1.5. (area of original part ≥ 6.5 cm2) |
|
Paragraph 5.1.6.
Since, in the presence of soft materials, the requirements apply only to the rigid support, the projection is measured for the rigid support only.
The shore hardness measurement is made on samples of the test subject itself. Where, due to the condition of the material, it is impossible to carry out a hardness measurement by the shore A procedure, comparable measurements shall be used for evaluation.
Paragraph 5.2.1.
Foot pedals, their arms and immediate pivotal mechanism, but not the surrounding support metal, shall be excluded from consideration.
The ignition key is deemed to satisfy the requirements of this paragraph if the protruding part of its shank consists of a material of between 60 and 80 shore A hardness and a thickness of at least 5 mm, or is covered with such a material of 2 mm minimum thickness on all surfaces.
Paragraph 5.2.2.
The criterion to determine whether the parking brake control can be contacted is the use
of:
the simulated head specified in annex 1, if the control is located above or on the level of the instrument panel (to be tested in accordance with paragraph 5.1. and within the impact zone);
the knee specified in annex 7 if the control element is located below the level of the instrument panel (in this case the control lever is tested in accordance with paragraph 5.3.2.3.).
Paragraph 5.2.3.
The technical specifications listed in paragraph 5.2.3. apply also to shelves and those parts of consoles below the level of the instrument panel located between the front seats, provided that these are located in front of the "H" point. If a cavity is closed it will be treated as a glove compartment and not be subject to these specifications.
Paragraph 5.2.3.1.
The dimensions specified refer to the surface before the addition of material of less than
50 shore A hardness (see paragraph 5.2.4.). Energy-dissipating tests shall be conducted in the spirit of annex 4.
Paragraph 5.2.3.2.
If a shelf becomes detached or breaks up, no dangerous features must result; this applies not only to the rim but also to other edges facing into the passenger compartment as a result of the applied force.
The strongest part of the shelf shall be considered to be adjacent to a fixture. Also, "substantially distorted" shall mean that, under the effect of the applied force, the deflection of the shelf, measured from the initial point of contact with the test cylinder, must be a fold or a deformation visible to the naked eye. Elastic deformation shall be admissible.
The length of the test cylinder shall be at least 50 mm.
Paragraph 5.3.
"Other parts" shall include such parts as window catches, seat belt upper anchorages and other parts located in the foot space and at the door side, unless these parts have been treated previously or are exempted in the text.
Paragraph 5.3.2.
The space between the forward bulkhead and the instrument panel which is located higher than the bottom edge of the instrument panel is not subject to the specifications of paragraph 5.3.
Paragraph 5.3.2.1.
The 3.2 mm radius applies to all contactable components covered by paragraph 5.3. when considered in all positions of use.
As exceptions, glove compartments shall be considered only in the closed position; seat belts will normally be considered only in the fastened position, but any part which has a fixed stowage position shall also comply with the 3.2 mm radius requirement in that stowed position.
Paragraph 5.3.2.2.
The reference surface is found by application of the device described in annex 6, paragraph 2., with a force of 2 daN. Where this is not possible, the method described in annex 6, paragraph 1., shall be used with a force of 2 daN.
The evaluation of dangerous projections is subject to the discretion of the authority responsible for the tests.
The force of 37.8 daN is applied even if the original projection is less than 35 or 25 mm, as applicable. The projection is measured under the applied load.
The horizontal, longitudinal force of 37.8 daN is normally applied by means of a flatended ram of not more than 50 mm diameter but, where this is not possible, an equivalent method may be used; for instance, by removing obstacles.
With new modern door designs, window winders handle is sometimes surrounded by the form of the door panel. It is often difficult or impossible for an occupant to touch the handle with his knees. It is up to the Technical Services to decide in this case with the agreement of the manufacturer whether or not to carry out the push test as described or not.
Paragraph 5.3.2.3.
The furthest projecting part, in the case of a gear lever, is that part of the grip or knob first contacted by a vertical transverse plane moved in a longitudinal, horizontal direction. If any part of a gear lever or handbrake lies above the "H" point level, that lever will have to be considered as if the whole of it were above the "H" point level.
Paragraph 5.3.4.
Where the horizontal plane(s) passing through the "H" point of the lowest front and rear seats do not coincide, then a vertical plane perpendicular to the vehicle' s longitudinal axis shall be determined, passing through the front seat "H" point. The exempted zone will then be considered separately for both the front and rear passenger compartments, relative to their respective "H" point and up to the vertical plane defined above.
Paragraph 5.3.4.1.
Movable sun visors shall be considered in all positions of use. The frames of sun visors shall not be regarded as rigid supports (see para. 5.3.5.).
Paragraph 5.4.
When the roof is tested to measure those protrusions and parts which can be contacted by a ball having a diameter of 165 mm, the roof lining must be removed. When evaluating the specified radii the proportions and properties attributable to the materials of the roof lining shall be taken into consideration. The roof testing area shall extend in front of and above the transverse plane limited by the torso reference line of the manikin placed on the rearmost seat.
Paragraph 5.4.2.1.
(See para. 5.1.1. for definition of "sharp edges").
The downward projection shall be measured normal to the roof in accordance with annex 6, paragraph 1.
The width of the projecting part shall be measured at right angles to the line of the projection. In particular the rigid roof sticks or ribs shall not project away from the inner surface of the roof more than 19 mm.
Paragraph 5.5.
Any roof ribs on opening roofs must meet paragraph 5.4. if they are contactable by a 165 mm diameter sphere;
Paragraphs 5.5.1.2., 5.5.1.2.1., 5.5.1.2.2.
The opening and operating devices when in a position of rest and with the roof closed must meet all of the specified conditions.
Paragraph 5.5.1.2.3.
The force of 37.8 daN is applied even if the original projection is 25 mm or less. The projection is measured under the applied load.
The force of 37.8 daN applied in the direction of impact defined in annex 4 as the tangent to the trajectory of the headform is normally applied by means of a flat-ended ram of not more than 50 mm diameter, but where this is not possible an equivalent method may be used; for instance, by removing obstacles.
The "position of rest" means the position of the operating device when it is in the locked position.
Paragraph 5.6.
The rod system of convertible tops does not represent a roll-over bar.
Paragraph 5.6.1.
The top part of the windscreen frame starts above the transparent contour of the windscreen.
Paragraph 5.7.1.1.
See paragraph 5.1.1. for definition of "sharp edge".
Paragraph 5.7.1.2.
In defining the head impact zone of the back of the front seats any structure necessary to support the seat back shall be considered as a component of this seat back.
Paragraph 5.7.1.2.3.
The padding of the seat frame structure shall also avoid dangerous roughness and sharp edges likely to increase the risk of serious injuries to the occupants.
ANNEX 1,
DETERMINATION OF THE HEAD-IMPACT ZONE
Paragraph 2.1.1.2.
The choice between the two procedures for determining height is to be left to the manufacturer.
Paragraph 2.2.
When determining points of contact, the length of the arm of the measuring apparatus is not changed during a particular operation. Each operation starts from the vertical position.
Paragraph 3.
The 25.4 mm dimension means the measurement from a horizontal plane passing through the "H" point to the horizontal tangent to the lower profile of the headform.
ANNEX 4,
PROCEDURE FOR TESTING ENERGY-DISSIPATING MATERIALS
Paragraph 1.4.
The breakage of any component during the energy-dissipation test, see Note on paragraph 5.1.2.
ANNEX 5,
PROCEDURE FOR DETERMINING THE "H" POINT AND THE ACTUAL TORSO ANGLE FOR SEATING POSITIONS IN MOTOR VEHICLES
Paragraph 4.
For determining the "H" point of any seat, other seats may be removed if necessary.”
[31] Remove clauses 21.2 to 21.3.2.3.
[32] Insert following
“Appendix B
- GENERAL REQUIREMENTS
- Except as provided in clause 1.2, when the area of the instrument panel that is within the ‘Head Impact Area’ is impacted in accordance with clause 1.3 by a 6.8 kg, 165 mm diameter head form at a relative velocity as specified in clause 1.1.1 or clause 1.1.2 below, the deceleration of the head form shall not exceed 80 times the acceleration due to gravity continuously for more than 3 milliseconds.
- 24.1 km/h for all vehicles other than those specified in clause 1.1.2
- 19.2 km/h for vehicles which meet the requirements of ADR 69/... for frontal impact using an inflatable supplementary restraint system for the front outboard passenger seating position.
- The requirements of clause 1.1 do not apply to:
- Console assemblies;
- Areas less than 127 mm inboard from the juncture of the instrument panel attachment to the body side inner structure;
- Areas closer to the windscreen juncture than those statically contactable by the head form with the windscreen in place;
- Areas outboard of any point of tangency on the instrument panel of a 165 mm diameter head form tangent to and inboard of a vertical longitudinal plane tangent to the inboard edge of the steering wheel; or
- Areas below any point at which a vertical line is tangent to the rearmost surface of the instrument panel.
- Test Procedures for Section 1.
- Tests shall be performed as described in SAE document J921 - “Instrument Panel Laboratory Impact Test Procedure”, June 1965, using the specified instrumentation or instrumentation that meets the performance requirements specified in SAE document J977 - “Instrumentation for Laboratory Impact Test”, November 1966, except that:
- the origin of the line tangent to the instrument panel surface shall be a point on a transverse horizontal line through a point 127 mm horizontally ‘Forward’ of the ‘Seating Reference Point’ of the front outboard passenger seating position; displaced vertically an amount equal to the rise which results from either a 127 mm ‘Forward’ adjustment of the ‘Seat’ or 19 mm; and
- the direction of impact shall be either in a vertical plane parallel to the vehicle longitudinal axis or in a plane normal to the surface at the point of contact.
- INTERIOR COMPARTMENT DOORS
- Each interior compartment door assembly located in an instrument panel shall remain closed when tested in accordance with clauses 2.2.1 and 2.2.2 or clauses 2.2.1 and 2.2.3. Additionally, any interior compartment door located in an instrument panel shall remain closed when the instrument panel is tested in accordance with clause 1.3. All interior compartment door assemblies with a locking device must be tested with the locking device in an unlocked position.
Note: Ash containers are not considered as interior compartments. However, if any ash container is in the ‘Head Impact Area’, it shall be tested in accordance with clause 1.1 in any configuration, i.e. open and closed.
2.2 Test Procedure For Section 2.
2.2.1 Subject the interior compartment door latch system to an inertia load of 10 times the acceleration due to gravity in a horizontal transverse direction and an inertia load of 10 times the acceleration due to gravity in a vertical direction in accordance with the procedure described in Section 5 of SAE document J839b - “Passenger Car Side Door Latch Systems”, May 1965, or January 1972 (editorial changes only) or an ‘Approved’ equivalent.
2.2.2 Conduct a front end longitudinal barrier collision test at not less than 48 km/h in accordance with SAE document J850 “Barrier Collision Tests”, February 1963, or an ‘Approved’ equivalent.
2.2.3 Subject the interior compartment door latch system to a horizontal inertia load of 30 times the acceleration due to gravity in a longitudinal direction in accordance with the procedure referred to in clause 2.2.1.”
1 for Germany, 2 for France, 3 for Italy, 4 for the Netherlands, 5 for Sweden, 6 for Belgium, 7 for Hungary, 8 for the Czech Republic, 9 for Spain, 10 for Yugoslavia, 11 for the United Kingdom, 12 for Austria, 13 for Luxembourg, 14 for Switzerland, 15 (vacant), 16 for Norway, 17 for Finland, 18 for Denmark, 19 for Romania, 20 for Poland, 21 for Portugal, 22 for the Russian Federation, 23 for Greece, 24 for Ireland, 25 for Croatia, 26 for Slovenia, 27 for Slovakia, 28 for Belarus, 29 for Estonia, 30 (vacant), 31 for Bosnia and Herzegovina, 32 for Latvia, 33 (vacant), 34 for Bulgaria, 35-36 (vacant), 37 for Turkey, 38-39 (vacant), 40 for The former Yugoslav Republic of Macedonia, 41 (vacant), 42 for the European Community (Approvals are granted by its Member States using their respective ECE symbol), 43 for Japan, 44 (vacant), 45 for Australia and 46 for Ukraine. Subsequent numbers shall be assigned to other countries in the chronological order in which they ratify or accede to the Agreement Concerning the Adoption of Uniform Technical Prescriptions for Wheeled Vehicles, Equipment and Parts which can be Fitted and/or be Used on Wheeled Vehicles and the Conditions for Reciprocal Recognition of Approvals Granted on the Basis of these Prescriptions, and the numbers thus assigned shall be communicated by the Secretary-General of the United Nations to the Contracting Parties to the Agreement.
In any seating position other than front seats where the "H" point cannot be determined using the "Threedimensional 'H' point machine" or procedures, the "R" point indicated by the manufacturer may be taken as a reference at the discretion of the competent authority.
Tilt angle, height difference with a seat mounting, surface texture, etc.


